Real Estate Photography Tips using a DSLR (Advanced Users)
These tips are intended for individuals who own or use a DSLR or Mirrorless DSLR camera with separate lenses (such as a Nikon D750, Canon EOS or Sony a7r). However, there are many other DSLR cameras that are well suited for real estate photography.
Choose the right time
Choosing the right time is very important for real estate photographers. If you have the opportunity, schedule a photo shoot during the daytime. This way you will get a lot of natural light and bright, saturated colors in your pictures.

If the weather is cloudy, you should try to choose another time for shooting. Some people like to photograph real estate during the sunset. Undoubtedly, you can get very beautiful shots in this time of the day.
However, you should consider one very important aspect: the sun should be behind the house. Thus, you will get really good lighting in this position.
Open blinds/windows
Figuring out how to shoot real estate photography correctly, you must remember that natural light is the best option. No artificial light sources can replace the sun.
If you have a flash, aim it at the opposite wall to bounce the light. This will help you highlight important details, such as metal, wooden or textile elements of furniture.
Besides, natural light will make your photos as realistic as possible, and the clients will see how the house actually looks.

Turn on all the lights for twilight exterior shots
This is one of the basic, but at the same time, very useful tips for real estate photography. Turning the lights on and off, you can achieve different effects. It all depends on your goals. For example, the additional light will give some warmth and coziness to your pictures.
Nevertheless, you should remember that such photos require light temperature correction during further photo editing.
Working with the lights off will bring you a balanced temperature, but such pictures will look quite cold.

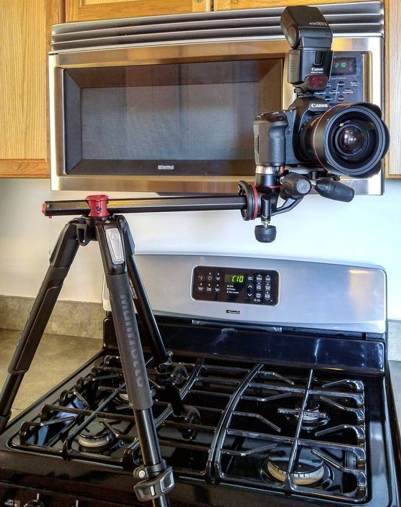
Use a tripod in low light
When there isn’t enough light, or you don’t have flashes, a tripod is an essential tool. Interior and exterior shots can benefit from a camera sitting as still as possible to prevent any sort of blur.
Wide-angle lenses
To take pro-level real estate photos, you must use good lenses that aren’t fixed. Very often, they play an even bigger role than a camera itself.
Choose wide-angle lenses- they will help you visually enlarge the room and create a more comfortable and inviting look. Wide angle lenses range between 12mm and 24mm focal lengths.
Use a flash
Add external flashes to your residential photography toolkit. As a rule, the standard flashes are too weak and are not enough to take professional images with even lighting. It is advisable to use an external flash.

You can attach it to your camera or place it anywhere to improve lighting and highlight important details.
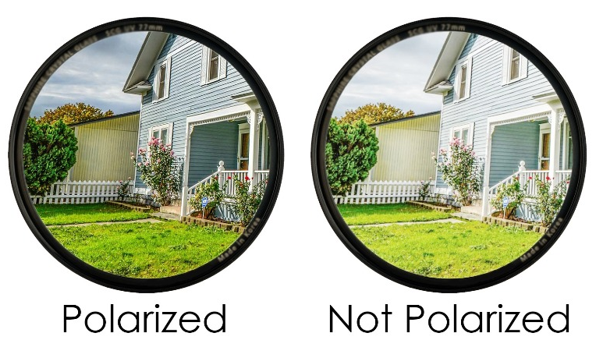
Use polarizing filters
Make sure you get a filter that is the right size for your particular lens and make sure it's a circular polarizing filter.
Use flash umbrellas
By changing the position of an umbrella, you will affect the power of flash. The further away you place the umbrella, the less light will come through it.

You may also want to consider a bounce umbrella. It comes with a lining, which is usually either silver or gold. However, a white lining will be the best option.
Find creative angles of shooting
Do not photograph the interior of the room from the corner when using wide angle lenses. Such photos look very trivially. Try to find more interesting, unusual angles.
For example, you can shoot a room from a doorway. In doing so, you may capture the maximum amount of space and show the whole room. Also, do not forget to pay attention to details. If you notice any distracting elements, such as a picture or some pieces of furniture, remove them from the frame to create a laconic and clear image.

Use props
Stage a bouquet of flowers and a bowl of fruit. This prop adds life and style without breaking the bank. Try just one color; all green apples or all red roses.
Get rid of clutter (stacks of paper, trash cans, spices and oils in the kitchen, and toiletries in the bathroom), and stage interiors for best results.
Remove all kitchen devices from counter tops. Toasters, blenders, shakers, and spices should all be placed away. Kitchens look best when they are open and clear of clutter.

Set proper camera settings
Residential photography requires good lighting. If you do not have special lighting equipment or do not know how to use it, you can try these camera settings to keep the quality of your photos high.
Aperture. Use an aperture value from f/7.1 to f/9. However, if you want to highlight some objects, you can try a shallow depth of field.
Shutter speed. The shutter speed should normally be between 1/60 and 1/2 a second. This value is dependent on the amount of light in the room.

ISO Settings
Higher shutter speeds require increasing the ISO value. Do not forget that too high an ISO can add a lot of digital noise to your photos. Try to set ISO below 400.
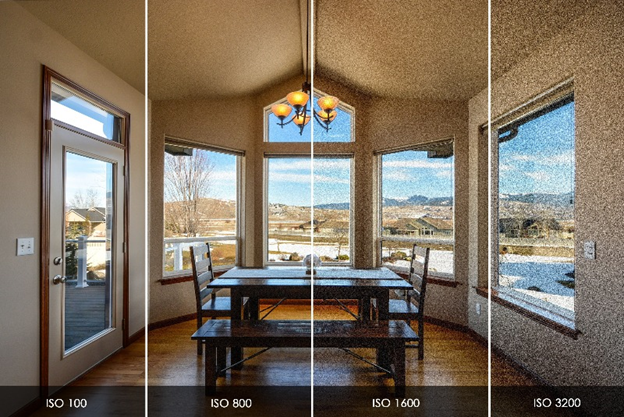
Learn your camera, experiment, and find the perfect value that will not spoil the quality of your pictures.
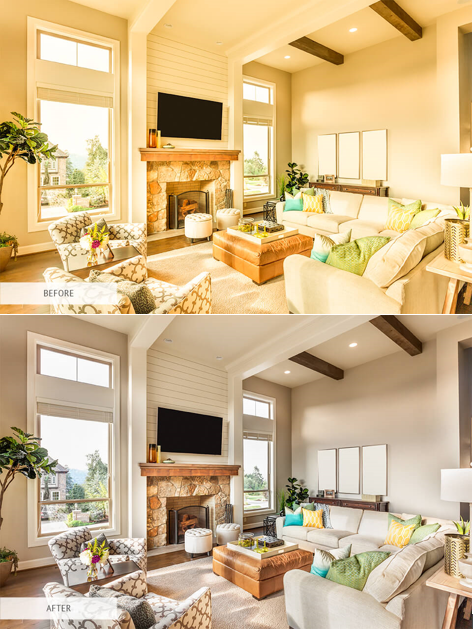
Fix color temperature
Using a manual white balance or temperature setting can help correct the color. For example, very often artificial lighting in the bathroom can give an unpleasant yellow tint. To eliminate this defect, you just need to move the white balance or temperature slider until the yellow shade turns into a plain white light.
Problems can occur if you use different light sources simultaneously: for example, combining daylight with LED, CFL, and halogen lamps.
Lighting for exteriors
Experiment with different lighting for real estate photography on location and take pictures with mixed lighting.
- Make sure your exterior photos are filled with sunlight.
- Do not remove all shadows while editing.
- Feel free to adjust curtains to correct the contrast in photos.
- Don’t photograph straight into bright windows – it makes the camera cut on the exposure.

Knowing the address of the property is very helpful- find its location on Google Maps and see which direction the house faces. It will give you a general idea of when it’s better to do a photo session.
Lighting for interiors

To avoid blurred images, take photos only from a standing position using a tripod.
Focus on the subject (animal, flowers, bookshelf, table, etc.) and adjust the light to it. Move the things in the room to compose the real estate photo well.
Take two lenses – a wide-angle one (24mm) is for all photos, a normal one (50mm) is for particular decorations/details in the room.
Turn off the exterior lights.
Don’t be afraid of using HDR effect, additional lights, a flash or a strobe.
Give preference to natural light.
A small (f/5.6-f/11) aperture is highly recommended.
Correct lens distortion
Perspective distortion is a fairly common problem in photography for real estate. It occurs because of the use of wide-angle lenses. There are two types of distortion:
- Barrel distortion: This defect occurs when using ultra-wide zooms. In this case, the photographer gets curved lines near the edge of the image instead of straight ones.
- Perspective distortion: This is a feature of wide-angle lenses. The perspective looks exaggerated because it differs from the usual perception of human eyes and the brain.
In order to eliminate these shortcomings, it is necessary to use photo editing tools correctly.
Shoot in RAW
This file format is for a deep and professional editing. 90% of the real estate photographers take JPEG photos and are satisfied with the quality they have. If you have photo editing tools and you're comfortable converting RAW images to JPEG, this is the way to go. RAW file formats will give you the most control while editing after the shoot.
Comments
Please sign in to leave a comment.